


This tut was written for those with a basic knowledge of psp.
I am using the awesome artwork of Misticheskaya .
You need a license to use this art work. Please do not use without a license.
You can find this art at PFD Store HERE
Supplies Needed
I used PSPX...but any of them should work.
Ghostly Manners FTU by Angela's Creations HERE
The kit is no longer on her blog, have no idea what she did with it.
Sorry for the problem.
Template by Dee and Kandee Collabs HERE
WSL_Mask 84 HERE
Filters
Oliver's Filter-Toile d' Araignee
Font Witched
Ghostly Manners FTU by Angela's Creations HERE
The kit is no longer on her blog, have no idea what she did with it.
Sorry for the problem.
Template by Dee and Kandee Collabs HERE
WSL_Mask 84 HERE
Filters
Oliver's Filter-Toile d' Araignee
Font Witched
Drop Shadow usually V2 H2 50 black
Open the template, duplicate and delete the credits, and the star, then go to Image, canvas size and as usual mine is 800 x 800.
Resize paper texture 70 to 84%, paste and apply your mask, delete and merge group, move below the template layers.
Green rectangle, resize paper sg3 to 84% and paste, invert delete.
Leave the orange strip as it.
Teal rectangle, resize paper texture 55 to 84%, paste, invert, delete.
Resize paper texture 70 to 84%, paste and apply your mask, delete and merge group, move below the template layers.
Green rectangle, resize paper sg3 to 84% and paste, invert delete.
Leave the orange strip as it.
Teal rectangle, resize paper texture 55 to 84%, paste, invert, delete.
Purple oval, resize paper texture 70 to 84%, invert, delete.
Green stripe and orange circle leave as is.
Orange square, paste paper 18, apply Oliver filter-Toil d'Araignee
Leave green rectangle as it.
Teal circle, resize sg3 paper to 84%, paste, invert, delete.
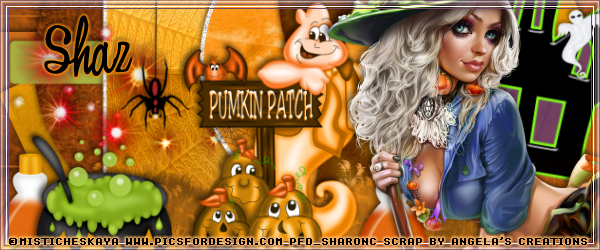
Resize the tree to 60%, mirror and place off center a bit.
Resize the grass hill to 50%, place on one side, duplicate and mirror.
Resize your tube to 40%, and place on the right side.
Resize the haunted house to 10%, free rotate to the right at 10%, place on the right side behind your tube layer.
Resize the pumpkin patch to 15% and place in the center more in front of the tree.
Resize the boiling cauldron to 25% and place on the left side.
Resize the bottle to 10%, place below the cauldron layer, duplicate, move over by the witch.
Merge all the wordart together and resize to 75%, place at the bottom of your tag where you want it.
Resize the bat to 3%, duplicate however many times you would like and place where you like them.
Paste the sparkle element 2 on the left side, move below the orange circle layer.
Resize the owl to 15%, place on the upper left on the tree.
Resize the ghost to 5%, place by the house, duplicate a couple of times and place where you like.
If you are going to do a signature do not merge yet.
Add any other elements that you would like, once happy, close off any background and merge visible.
Green stripe and orange circle leave as is.
Orange square, paste paper 18, apply Oliver filter-Toil d'Araignee
Leave green rectangle as it.
Teal circle, resize sg3 paper to 84%, paste, invert, delete.
Resize the tree to 60%, mirror and place off center a bit.
Resize the grass hill to 50%, place on one side, duplicate and mirror.
Resize your tube to 40%, and place on the right side.
Resize the haunted house to 10%, free rotate to the right at 10%, place on the right side behind your tube layer.
Resize the pumpkin patch to 15% and place in the center more in front of the tree.
Resize the boiling cauldron to 25% and place on the left side.
Resize the bottle to 10%, place below the cauldron layer, duplicate, move over by the witch.
Merge all the wordart together and resize to 75%, place at the bottom of your tag where you want it.
Resize the bat to 3%, duplicate however many times you would like and place where you like them.
Paste the sparkle element 2 on the left side, move below the orange circle layer.
Resize the owl to 15%, place on the upper left on the tree.
Resize the ghost to 5%, place by the house, duplicate a couple of times and place where you like.
If you are going to do a signature do not merge yet.
Add any other elements that you would like, once happy, close off any background and merge visible.
Resize first, then add your Copyrights and name and that's it.
If you want to do a signature
Open a new image 600 x 250, fill with #cb6c1a, close off your tube layer and wordart layer of your tag and paste, resize to 95% and adjust how you want it, then go back to your tag, open your tube layer, and copy and paste on the right side.
Merge visible and add a frame of choice, then add your copyright and name.
For the Avator,
size depending on your group or forum.
I did mine 150 by 200, copy the tag, resize to 75% and place how you wanted it, then merge visible, add your frame, copyright and name.
Hope you enjoyed doing this tut.

No comments:
Post a Comment